Why a No-Bake Strawberry Cheesecake is Your Summer MVP
Summer calls for desserts that are light, refreshing, and, most importantly, easy to make. That's where the no-bake strawberry cheesecake steps in as the undisputed champion of warm-weather entertaining. Forget turning on your oven and heating up your kitchen; this delightful creation offers all the creamy, dreamy indulgence of a classic
baked strawberry cheesecake without any of the fuss. It's the perfect treat to whip up for impromptu garden parties, backyard barbecues, or simply to satisfy that sweet craving on a lazy afternoon.
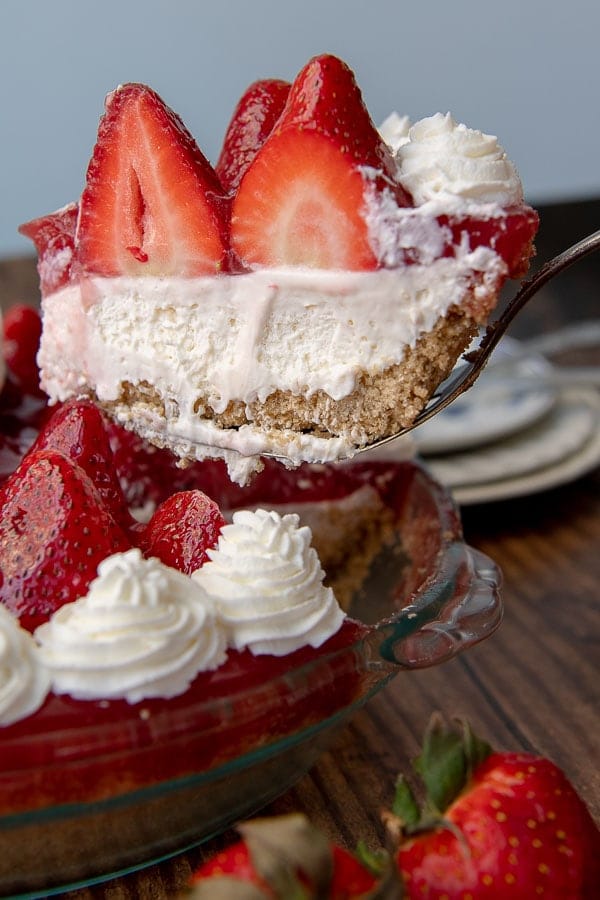
Imagine a crisp, buttery biscuit crust providing the ideal counterpoint to a velvety smooth, sweet-tart cream cheese filling, all crowned with a vibrant explosion of fresh, juicy strawberries. This isn't just a dessert; it's a sensory experience that perfectly encapsulates the joy of summer. Its simplicity belies its impressive appearance, making you look like a culinary genius with minimal effort. Plus, the ability to prepare it entirely ahead of time means you can spend less time in the kitchen and more time enjoying your guests and the sunshine.
The Irresistible Allure of Strawberry Cheesecake
What makes strawberry cheesecake such an enduring classic? It's the harmonious balance of flavors and textures. The sweet tang of ripe strawberries, whether folded into the filling or piled generously on top, cuts beautifully through the rich creaminess of the cheesecake. This particular no-bake version amplifies that refreshing quality, delivering a lighter mouthfeel that's perfectly suited for warm weather. It's truly a sweet-tart-tangy-creamy-out-of-this-world treat that promises to be a welcome addition to any summer celebration.
Gather Your Simple Ingredients for Strawberry Cheesecake Perfection
One of the most appealing aspects of this easy no-bake strawberry cheesecake is its surprisingly short ingredient list. You'll likely find most of what you need already stocked in your pantry and fridge, meaning you're just a quick trip away from dessert glory. Quality ingredients are key here, as they form the foundation of that irresistible flavor and texture.
Here’s what you’ll need for your show-stopping no-bake strawberry cheesecake:
- For the Crust:
- Digestive Biscuits or Graham Crackers: These form the crunchy, buttery base. If you're in the UK, digestive biscuits are the classic choice. In the USA, graham crackers are an excellent, readily available substitute. Both provide that perfect mild sweetness and sturdy texture.
- Unsalted Butter: Melted butter binds the crushed biscuits together, creating a firm, flavorful crust. Unsalted is preferred so you can control the overall saltiness.
- For the Creamy Filling:
- Full-Fat Cream Cheese: This is non-negotiable! Full-fat cream cheese is crucial for achieving that signature rich, dense, and stable cheesecake texture. Reduced-fat versions contain more water and will result in a runny, less luxurious filling. Ensure it's softened to room temperature for a lump-free mixture.
- Double Cream (Heavy Cream): This is what gives the cheesecake its light, airy, yet incredibly creamy consistency. When whipped, it adds volume and helps the cheesecake set beautifully without baking. Make sure it's chilled straight from the fridge for optimal whipping.
- Icing Sugar (Powdered Sugar): Provides sweetness and dissolves seamlessly into the filling, preventing any granular texture. Sifting it beforehand ensures a perfectly smooth finish.
- Fresh Strawberries: A portion of these will be finely chopped and folded into the filling, infusing every bite with natural fruit flavor.
- For the Vibrant Topping:
- Fresh Strawberries: The star of the show! Whole or sliced fresh strawberries piled high make for a stunning presentation and a burst of fresh flavor.
Crafting Your Easy No-Bake Strawberry Cheesecake: Step-by-Step
Making this no-bake strawberry cheesecake is a straightforward process, perfect for beginners and seasoned dessert makers alike. Follow these steps to create your perfect summer treat.
Step 1: Prepare the Crumb Crust
- Crush Your Biscuits/Crackers: Place your digestive biscuits or graham crackers into a food processor and pulse until finely ground. If you don't have a food processor, place them in a sturdy Ziploc bag and crush them with a rolling pin until fine crumbs are formed.
- Combine with Butter: Melt the unsalted butter in a microwave-safe bowl or small saucepan. Pour the melted butter over the biscuit crumbs in a medium bowl and mix thoroughly until all crumbs are moistened. It should resemble wet sand.
- Press into Pan: Transfer the mixture to a 9-inch springform pan. Using the bottom of a glass or your knuckles, press the crumb mixture firmly and evenly into the bottom of the pan to form a solid base. Ensure it's compact so it doesn't crumble when sliced.
- Chill: Place the crust in the refrigerator for at least 30 minutes (or the freezer for 15 minutes) to allow it to firm up while you prepare the filling.
Step 2: Prepare the Creamy Strawberry Filling
- Whip the Cream: In a large, chilled mixing bowl, add the cold double cream (heavy cream). Using an electric mixer (handheld or stand mixer with a whisk attachment), whip the cream on medium-high speed until it forms stiff peaks. Be careful not to over-whip, or it will become grainy. Set aside.
- Prepare Cream Cheese Mixture: In a separate large bowl, combine the softened full-fat cream cheese and sifted icing sugar. Beat with an electric mixer on medium speed until the mixture is completely smooth, light, and fluffy, with no lumps. This usually takes 2-3 minutes.
- Fold in Strawberries: Finely chop a portion of your fresh strawberries (about 1 cup). Gently fold these chopped strawberries into the cream cheese mixture. It's a good idea to pat the chopped strawberries dry with a paper towel first to prevent excess moisture from making your filling too loose.
- Combine Mixtures: Gently fold the whipped cream into the cream cheese and strawberry mixture. Do this in two additions, using a spatula to carefully incorporate the whipped cream without deflating it too much. The goal is a light, airy, and uniform filling.
Step 3: Assemble and Chill
- Fill the Crust: Retrieve your chilled crust from the refrigerator. Spoon the creamy strawberry filling evenly over the crust. Use an offset spatula or the back of a spoon to smooth the top.
- Chill Thoroughly: Cover the springform pan loosely with plastic wrap and return it to the refrigerator. This is the most crucial step for a firm, sliceable no-bake cheesecake! Chill for a minimum of 6 hours, but ideally overnight, to allow the cheesecake to set completely.
Step 4: Decorate and Serve
- Remove from Pan: Once fully chilled, carefully run a thin knife around the edge of the cheesecake before releasing the springform pan sides.
- Top with Strawberries: Arrange your remaining fresh strawberries on top of the cheesecake just before serving. You can slice them, halve them, or leave them whole for a beautiful display.
- Serve: Slice with a sharp, warm knife (wiped clean between cuts for neat slices) and enjoy your magnificent homemade no-bake strawberry cheesecake!
Expert Tips for the Best No-Bake Strawberry Cheesecake Experience
While this no-bake strawberry cheesecake recipe is incredibly forgiving, a few expert tips can elevate your dessert from delicious to absolutely unforgettable.
- Mind Your Temperatures: Ensure your full-fat cream cheese is at room temperature before mixing. This is vital for a smooth, lump-free filling. Conversely, your heavy cream must be very cold to whip properly and achieve stiff peaks.
- Sift Your Icing Sugar: Powdered sugar can clump. Sifting it before adding to the cream cheese mixture will prevent any gritty texture in your silky-smooth filling.
- Don't Over-Mix: Once the whipped cream is folded in, mix just until combined. Over-mixing can deflate the cream, leading to a denser, less airy cheesecake.
- Drain Those Strawberries: When adding chopped strawberries to the filling, pat them dry with a paper towel. Strawberries naturally release juice, and excess moisture can make your cheesecake filling less firm. This tip is especially important for maintaining the structural integrity of your no-bake delight. For vibrant and crack-free results in any cheesecake, check out our guide on Homemade Strawberry Cheesecake: Fresh, Vibrant & Crack-Free Tips.
- Chill Time is Non-Negotiable: The temptation to dig in early is real, but resist! A minimum of 6 hours (and ideally overnight) in the fridge is essential for the cheesecake to fully set and achieve its perfect sliceable texture. Impatience here will lead to a messy, disappointing experience.
- Make It Ahead: This is a fantastic make-ahead dessert! You can prepare the entire cheesecake (without the final strawberry topping) up to 2 days in advance. Store it covered in the refrigerator. Add fresh strawberries just before serving for optimal freshness and appearance.
- Storage: Store leftover strawberry cheesecake tightly covered in the refrigerator for up to 3-4 days.
- Serving Presentation: For extra flair, consider a drizzle of strawberry coulis or a sprinkle of finely chopped pistachios for a color contrast when serving.
This easy no-bake strawberry cheesecake is more than just a recipe; it's an invitation to savor the sweet, refreshing flavors of summer without the stress. Its elegant simplicity makes it the perfect centerpiece for any gathering, promising smiles and satisfied sighs with every delicious bite. So go ahead, embrace the ease, gather your ingredients, and create a truly memorable dessert that will have everyone asking for your secret recipe.